Jack Stands

Organizing those oddly shaped Jack Stands

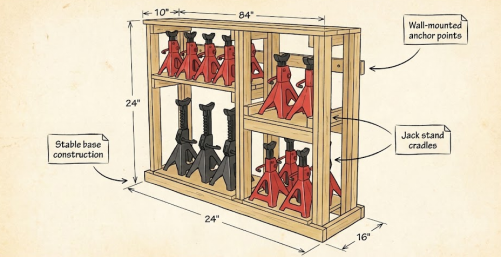
Wooden rack design for organizing and storing many jack stands securely.

Working in the garage all day but always feeling like there’s not enough space? Those irregularly shaped, heavy jack stands always seem to be in the wrong place. They might be haphazardly piled in a corner or crammed under a workbench, not only taking up valuable floor space but also inadvertently becoming a potential tripping hazard.

Don’t worry, I’m not here to criticize your garage for being messy, but to share some practical and safe space-saving hacks.

Today, I’ll show you why proper jack stand organization is far more than just “for tidiness”—it’s an integral part of your garage’s safety system. We’ll delve into three specific DIY methods—from classic wooden racks and economical PVC pipe supports to modern, precise 3D-printed jack stand mounts—to guide you step-by-step in creating your own custom jack stand storage rack, making your garage both safe and efficient.


Why Your Jack Stands Need a “Home”: Considerations of Security and Efficiency

You might think that jack stands are just tools and can be placed anywhere. But based on my years of experience in garage safety, this kind of thinking is precisely the starting point for many safety hazards.

Potential hazards of improper storage: more than just tripping

Imagine you’re focused on changing brake pads, tools scattered everywhere, and those bulky jack stands lying carelessly at your feet. One slip, and you could not only fall and get injured, but worse, it would distract you and potentially cause problems with the vehicle you’re repairing.

In my experience reviewing accidents, I’ve seen far too many cases where seemingly insignificant tool placement led to operator distraction and ultimately, a much larger accident.

DIY isn’t the problem; losing control is.

More importantly, jack stands are not indestructible. If they are frequently carelessly discarded, bumped, or even dropped from heights, their metal structure may deform, and pins or ratchet mechanisms may be damaged.

These subtle, imperceptible damages can silently become fatal defects the next time the vehicle is lifted. Imagine how dangerous it would be if your beloved car were securely supported on jack stands, unaware that they had suffered internal damage.

Therefore, giving your jack stands a sturdy “home” is not only to prevent tripping but also to protect these critical safety supports, ensuring they perform at 100% safety every time they are used.

Save space and improve garage efficiency

We all know that garage space is extremely valuable. Especially for families with multiple cars and a lot of tools, making efficient use of every inch of space is crucial. Jack stands are usually bulky and take up a lot of space; scattering them on the floor not only makes the garage look cluttered but also hinders movement and workflow.

By vertically storing jack stands on the wall, you not only free up valuable floor space and make your garage look neater, but you also significantly improve work efficiency. They are within easy reach when you need them and won’t become an obstacle when you don’t. An organized garage wall storage idea allows you to focus wholeheartedly on the task at hand during every repair or maintenance.


DIY Wall Storage Solutions: Tailor-made for your Jack Stands

Now, let’s delve into several simple, practical, and cost-effective DIY jack stand storage rack solutions. No matter what materials you have on hand, there’s bound to be one that suits you.

Option 1: Sturdy and durable wooden hanging rack – classic and reliable

Wood is one of the most common and reliable materials for DIY projects. A well-made wooden rack can provide sturdy support for your jack stands.

Production steps:

  1. Materials Preparation: Find some scrap wood, such as 2×4 or 2×6 timber (if the jack stands are heavy, it is recommended to choose thicker timber). Ensure the wood is dry and free of cracks. You will also need screws (long enough to penetrate the timber and penetrate the wall post about 3-5 cm), measuring tools, an electric drill, a saw, and a level.
  2. Measurement and Design: First, measure the width and height of your jack stands, as well as the shape of their base and support points. When designing, ensure each jack stand has an independent support point and can be securely suspended. Typically, I design an L-shaped or U-shaped structure so that the top beam or legs of the jack stands can be inserted into it. Remember, load-bearing capacity is the primary consideration; include sufficient safety margins in the design.
  3. Cutting and Assembly: Cut the wood according to the design drawings. For example, cut two vertical timbers as the main supports, and then cut several horizontal timbers as the load-bearing arms of the jack stands. Use screws to fix the horizontal arms to the vertical timbers to form a structure that can support the jack stands. Depth Rules: When fixing to the wall, be sure to find the studs inside the wall and use long screws to firmly fix the wooden rack to the studs. The grain direction of the wood is closely related to the load-bearing capacity; timbers fixed perpendicular to the wall should utilize their maximum load-bearing surface as much as possible. Screws should be inserted deep into the studs to ensure that the rack can withstand the static load of the jack stands and the impact force during removal and placement.
  4. Attaching to the wall: Use a level to ensure the bracket is installed straight, then use a drill and long screws to fix it to the wall post.

Precautions:

  • Be sure to choose dry wood that is free from rot and obvious cracks.
  • Fixing it to the wall post is crucial to ensuring the safe load-bearing capacity of the bracket.
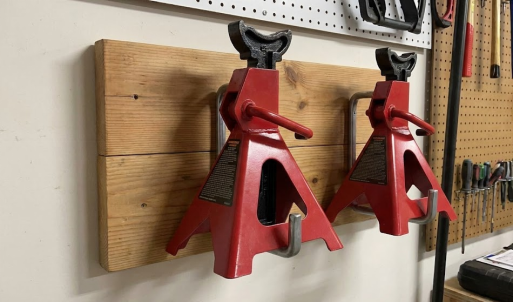
Two red jack stands neatly hung on a wooden wall mount in a garage.

Option 2: Flexible and lightweight PVC pipe supports – economical and practical

If you don’t have much wood on hand, or if you’re looking for a lighter, more flexible storage solution, then PVC pipes are a good option.

Production steps:

  1. Materials preparation: Purchase sufficiently thick industrial-grade PVC pipes (at least 1.5 inches or more in diameter), as well as matching PVC fittings (such as T-shaped fittings and elbows), PVC glue, and a saw.
  2. Size Planning: Measure the dimensions of your jack stands’ base and legs. The design principle of the PVC bracket is to create a frame that can support or hold the jack stands in place. You can design it as a “U” or “L” shaped structure, utilizing the flexibility of the PVC tubing to secure the jack stands.
  3. Cutting, Bonding, and Securing: Cut the PVC pipes according to your design drawings. Then, use PVC-specific adhesive to bond the pipes and fittings together to form a complete support structure. Ensure the adhesive is fully cured, which typically takes several hours. Depth Guidelines: When bonding, ensure all fittings are fully inserted and tightly joined to prevent them from coming loose under stress. The adhesive’s curing time is crucial; incompletely cured adhesive will significantly reduce the structure’s strength.
  4. Fixing to the wall: Holes can be pre-drilled in the PVC bracket, or U-shaped pipe clamps can be used to fix it to the wall post.

Precautions:

  • Choose sufficiently thick industrial-grade PVC pipes instead of ordinary household drain pipes to ensure adequate strength and load-bearing capacity.
  • PVC adhesive must be fully cured before it can bear weight; otherwise, it may cause the structure to become loose.
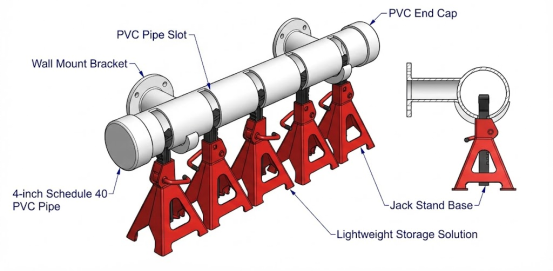
Diagram of PVC pipe storage system securely holding four red jack stands.

Option 3: Personalized 3D Printed Hooks – Modern and Precise

If you own a 3D printer or have access to 3D printing services, then a 3D printed jack stand mount is the best choice for ultimate personalization and precise storage.

Applicable scenarios and advantages:

  • Perfect fit: 3D printing can create hooks that fit perfectly to your specific jack stands model, achieving seamless storage and maximizing space utilization.
  • Customizable features: You can design embedded, snap-on, or limit-feature structures to ensure the jack stands are stable and do not wobble.
  • Material selection: Different materials such as PLA, PETG, or ABS can be selected to meet different strength and environmental requirements. For example, PETG performs better in environments such as garages where temperature fluctuations may occur.

Design considerations:

  1. Precise Measurement: Use vernier calipers to accurately measure key dimensions of jack stands, such as the thickness and width of the top beam, and the diameter or cross-sectional shape of the legs.
  2. Structural Design: Design the hooks in CAD software (such as Fusion 360 or SketchUp). They can be designed as two independent supports, each supporting one end of the jack stand, or as a single, integrated bracket. Ensure the structure has sufficient wall thickness and reinforcing ribs.
  3. Depth Rules: The layer height and infill density of 3D printed parts are crucial to the strength of the final part. For load-bearing components, a lower layer height (e.g., 0.2 mm) and a higher infill density (e.g., 50% or higher) are recommended to increase strength. Simultaneously, the direction of stress on the printed part should be considered during the design phase, ensuring that the layer lines are perpendicular to the primary stress direction to prevent delamination.
  4. Fixing to the wall: The hook itself can be designed with screw holes, and can be fixed to the wall post with screws.

Precautions:

  • Choose durable printing materials and consider the effects of UV radiation and temperature in a garage environment. For example, PLA is prone to deformation at high temperatures, making PETG or ABS more suitable.
  • Even with 3D printed parts, when fixing them to a wall, the wall’s load-bearing capacity must still be considered, and they should be fixed to a column as much as possible.

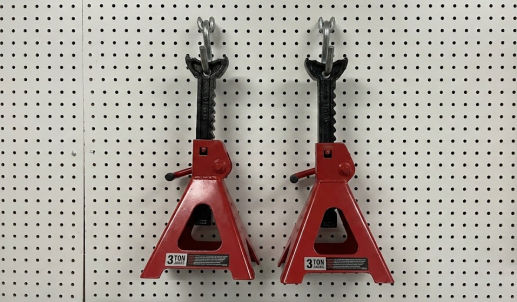
Two red 3-ton jack stands hanging neatly on a white garage pegboard.

Choosing the right storage location: wall load-bearing capacity and ease of access.

Building your DIY jack stand storage rack, choosing the right installation location is equally crucial. This not only affects the stability of the storage but also directly impacts your daily operational safety.

Load-bearing capacity assessment: Safety first principle

Even the sturdiest wall mount is useless if it’s fixed to a weak wall. This is an engineering/mechanical logic issue that I’ve always emphasized.

  • Wall studs and drywall: Most garage walls are supported by wooden or metal studs and covered with drywall. Drywall itself has very limited load-bearing capacity and is only used to secure lightweight items. Studs, on the other hand, form the framework of the wall and can bear greater weight. Therefore, all load-bearing brackets must be secured to wall studs.
  • How to find the pillars: You can easily find the location of pillars inside the wall using a simple pillar finder.
  • Personal experience to share:

    “I’ve seen too many people underestimate the load-bearing capacity of the wall and directly fix heavy objects to the plasterboard, resulting in the entire rack and tools falling down, damaging the tools and potentially injuring people.”


  • Table: Load-bearing capacity reference table for common wall materials


    Wall material typesLoad-bearing capacity (single point)Suitable for fixingPrecautions
    Wall studs​Extremely high (tens to hundreds of kilograms)All heavy-duty racks, such as jack stands racksMake sure to find and secure it with a screw that is long enough.
    Drywall​​Extremely low (within a few kilograms)Lightweight picture frames, gadgetsNever use it to secure heavy objects such as jack stands.
    brick wall/concrete wallVery high (tens of kilograms)All heavy-duty racksA hammer drill is required, along with expansion bolts.

Ergonomics and Daily Use

In addition to load-bearing capacity, the height and position of the hanger also need to be considered in terms of ergonomics.

  • Easily accessible height: It is recommended to place the jack stands at a height that allows you to easily reach them without having to bend over excessively or stand on tiptoe. Generally, a height of about 1.2 to 1.5 meters from the ground is ideal.
  • Consider your garage layout: Ensure the rack will not obstruct garage doors, windows, or your vehicle after installation. Avoid areas with power outlets, light switches, etc.

Summarize

Okay, friends, today we’ve discussed jack stand storage, which goes far beyond simply moving them off the ground. It’s about the safety, efficiency, and order of your garage. Whether you choose a classic wooden DIY jack stand storage rack, an economical PVC pipe rack, or a modern, precise 3D-printed jack stand mount, the core principle remains the same: provide your jack stands with a safe, secure, and easily accessible “home.”

A neat and organized garage is the foundation for safe operation and a prerequisite for enjoying the fun of DIY. Hopefully, these Space-Saving Hacks will help you properly store those oddly shaped jack stands, making your garage more organized and a safe and efficient personal workstation.

Remember, safety is always the top priority. Now, it’s time to get started and create a custom hanging jack stands organizer for the “big guys” in your garage!

FAQ

Why is it not recommended to stack Jack Stands directly in a corner?

Stacking jack stands directly in a corner not only creates a cluttered garage environment and increases the risk of tripping when moving or retrieving other tools, but also causes damage to their surface coatings and accelerates the corrosion of metal parts due to mutual compression and collisions.

More seriously, long-term improper stacking may cause minor deformations in the jack stands’ structure, affecting their overall stability and load-bearing capacity, thus creating potential safety hazards.

How should the load-bearing capacity of a DIY wall hanging rack be calculated and evaluated?

The load-bearing capacity of a DIY wall mount depends primarily on the strength of the materials you choose (wood, PVC, 3D printed parts), the mount’s design, and how it’s secured to the wall.

When calculating, multiply the weight of a single jack stand (typically a 3-ton jack stand weighs about 5-10 kg) by the number of units you plan to mount, and then multiply by a safety factor of at least 2-3.

Most importantly, regardless of the material used, the mount must be securely fixed to studs inside the wall, not just to drywall. Using a stud detector to locate the studs and selecting sufficiently long (3-5 cm deep) and strong screws for secure mounting is fundamental to ensuring load-bearing safety.

Besides the DIY solutions mentioned above, what other simple ways are there to temporarily store Jack Stands?

Heavy-duty tool cart: If your garage space allows, you can buy a tool cart with sufficient load-bearing capacity and place the jack stands at the bottom or side of the cart for easy movement and access.

Existing rack bottom space: Utilize the bottom or lower middle level space of the existing heavy-duty racks in the garage, and install a simple baffle (such as a wooden or metal strip) at the edge of the rack to prevent jack stands from rolling off.

Corner area optimization: If there is really no wall space, you can build a low platform with a fence using a few thick wooden planks in a less frequently used corner of the garage, and place the jack stands on it in an orderly manner to avoid them being scattered directly on the ground.

However, please remember that while these temporary solutions can provide a certain level of tidiness, they are not as effective as professional wall-mounted systems in utilizing vertical space and completely eliminating ground obstructions. In the long run, DIY wall-mounted solutions are the better choice.

author-avatar

About Gavin Reid

Gavin Reid has been obsessively analyzing garage safety protocols and vehicle support systems for over a decade. After transitioning from a professional service bay to independent safety consulting in 2020, Gavin realized the market was flooded with confusing weight ratings and compromised designs that offered a false sense of security. His Mission: To help DIY mechanics—especially home hobbyists—identify critical failure points in vehicle lifting and ensure every project ends safely. Why Trust Gavin: Engineering Obsessive: He dissects load paths and weld integrity. From metallurgy to geometric stability, he understands the physics that keep two tons of steel from crushing a human chest. Data-Driven Testing: Gavin has stress-tested 40+ models, evaluating lateral stability and locking redundancy rather than just "marketing tonnage." In the Garage: He’s a fixture in local DIY communities, frequently inspecting frame rails for pinch weld placement and documenting metal fatigue on aging gear. Gavin believes that "a lapse in physics is a permanent mistake." He is dedicated to teaching mechanics how to maintain a "zero-trust" relationship with their equipment. Would you like me to provide Gavin’s specific checklist for identifying structural fatigue in used jack stands?