Jack Stands

Field repairs: Safely using jack stands on gravel or dirt.

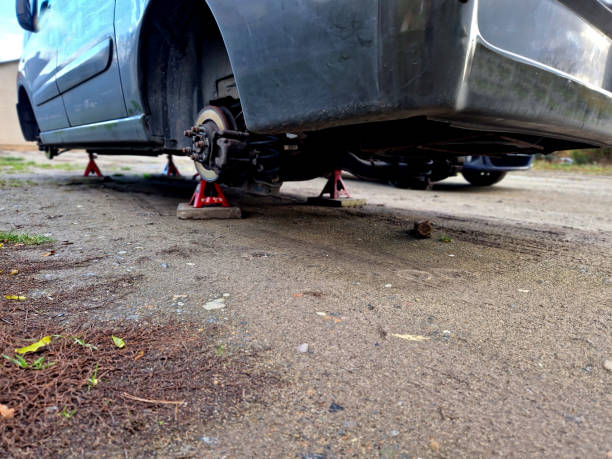
Car raised on red jack stands on dirt, wheels removed for maintenance.

Many car owners don’t have a perfect concrete garage to use when facing vehicle problems. Whether it’s their own gravel driveway, dirt path, or soft asphalt surface for temporary parking, these “non-standard surface” repair scenarios are far more common than we imagine. And it is precisely in these seemingly insignificant details that safety risks are often magnified infinitely.

jack stands on non-standard surfaces such as gravel and dirt , and provide a range of proven, expert-level solutions to ensure you can perform maintenance safely and reliably in any environment.

I. Safety Challenges in Maintaining Non-Standard Floors

Many car owners, when starting DIY repairs, often assume an ideal condition: a flat, hard concrete surface. However, the reality is that our repair environment is often full of uncertainties. Gravel in the backyard, mud on country roads, or even asphalt softened by the summer sun can all become “hidden killers” when lifting your vehicle.

many accidents, the support bracket slipped or sank on the gravel road, causing the vehicle to lose stability instantly. This is not just a matter of tool damage, but could also result in serious physical injury.

This makes me extremely wary of “parameter worship” and “wishful thinking.” While the rated load of the support bracket is important, without a stable “foundation,” even the highest load capacity is just theoretical.

My purpose is not to scare you, but to remind you: safety must always be the top priority in every lift.


II. Core Risks of Support Frames on Non-Standard Ground: Mechanical and Engineering Analysis

To solve a problem, you must first understand it. Why do gravel, mud, or soft asphalt surfaces become “invisible killers” of car support brackets? This involves basic mechanical principles and material properties.

A. Unstable foundation: Why are gravel, soil and soft asphalt “invisible killers”?

Pressure Concentration and Sinking: The “Footprint” of Bracket Bases and Ground Bearing Capacity Issues. When the weight of a vehicle is transferred to the ground through the brackets, the bracket bases (usually the four small corners) create significant localized pressure. This isn’t a problem on hard concrete. However, on gravel, soil, or soft asphalt, these materials are far less capable of bearing weight than concrete.

  • Gravelly ground: The gravel has gaps between it, making it prone to displacement and rearrangement under pressure, causing the support structure to slowly sink. If the gravel layer is under soft soil, the sinking will be more severe.
  • Soil: Soil has a loose granular structure and is particularly unstable when the water content is high. The pressure of the support structure will directly “squeeze” the soil apart, causing it to sink rapidly.
  • Soft asphalt: At high temperatures, asphalt softens, and its viscoelasticity causes the support base to gradually “melt” into it, much like stepping on chewing gum. This not only causes sinking but can also leave permanent dents when the support is lifted. This sinking process may be gradual and imperceptible, but once a critical point is reached, the vehicle will suddenly lose balance.

Lateral Slippage Risk: The Sliding Friction Characteristics of the Gravel Layer and the Stability of the Support Structure. Another major issue with gravel surfaces is their coefficient of sliding friction.

When a vehicle is lifted, even if it appears to be pressed vertically, any slight wobbling, wind, or lateral force applied under the vehicle (such as tightening a stubborn bolt) can cause the support base to slip slightly laterally on the unstable gravel layer.

It’s difficult for sufficient static friction to form between the gravel particles to resist this lateral force, and once slippage begins, it can trigger a chain reaction, ultimately causing the support structure to tip over.

Unpredictable ground deformation: The effects of moisture, vibration, and temperature on the ground. The ground conditions in the field are not static.

  • Moisture: Rain or groundwater infiltration can significantly reduce the bearing capacity of soil and gravel.
  • Vibration: Shaking during vehicle lifting or vibration caused by nearby heavy vehicles passing by can accelerate the sinking or slippage of the support.
  • Temperature: As mentioned earlier, high temperatures soften asphalt, while low temperatures can cause moist soil to freeze, then soften again after thawing, forming a “freeze-thaw cycle” that further damages the ground structure.

B. Support structure in contact with the ground: the root of design limitations

Traditional bracket base design: Optimized for hard, level surfaces. Most commercially available car mounts are designed with their bases in mind for use on hard, flat concrete garage floors. They typically have four small feet, intended to provide sufficient vertical support, but are not well-suited for distributing pressure and resisting lateral slippage.

Stress analysis of the bracket feet: Point contact and excessive local pressure. When the four small feet of the bracket contact the ground, the entire weight of the vehicle (through the bracket) is concentrated on these narrow contact points. This results in extremely high pressure per unit area, far exceeding the bearing capacity of the soft ground, thus causing sinking.

C. Vehicle center of gravity and stability: the amplification effect of even a small tilt

The increased center of gravity and instability after a vehicle is lifted: When a vehicle is lifted, its center of gravity rises significantly. The higher the center of gravity, the worse the vehicle’s stability, and the higher the requirements for the flatness of the foundation and the stability of the support structure.

Imagine a tall glass and a short glass; which is easier to tip over? The answer is obvious.

How does uneven ground affect the vertical load-bearing capacity and lateral anti-overturning ability of the support? Even uneven ground, which is difficult to detect with the naked eye, can cause uneven force on the four legs of the support. Some supports may bear excessive loads, or the support itself may tilt slightly, causing the vehicle’s weight to no longer be completely vertical downward, but instead generate a lateral component force. This greatly increases the risk of lateral slippage of the support, thereby reducing its anti-overturning ability.


III. Preparations for Field Maintenance: Building a Safety Foundation

When performing repairs on non-standard surfaces, thorough preparation is key to building a solid foundation for safety.

A. Site Selection and Evaluation:

  1. Prioritize the most solid and flattest area: Before starting repairs, take a few minutes to carefully observe the surrounding environment. Find the area that appears most solid and drains best. Step on the ground to feel its firmness. Use a level (either a mobile app or a physical tool) to check the flatness of the ground, especially in areas where support brackets will be placed.
  2. Clear obstacles and debris: Remove all rubble, branches, tools, weeds, and other items from the maintenance area that may affect the stability of the support structure. Create a locally hardened environment for the support structure.
  3. Check ground moisture and future weather forecast: Wet soil has extremely poor load-bearing capacity. If the ground is wet and rainfall is forecast, be sure to consider postponing maintenance or taking higher-level precautions. In wet environments, metal supports are more likely to slip on the support pads, requiring extra attention to slip prevention.

B. Tool Selection and Inspection:

  1. Choose a bracket with a rated load capacity far exceeding the vehicle’s weight: this is the bottom line for safety redundancy. The rated load capacity of a bracket usually refers to the load-bearing capacity of a “pair” or “single” unit; please refer to the product manual for details.Even so, I always recommend choosing a bracket with a total load capacity of at least twice the vehicle’s total weight, even if you only need to lift one end of the vehicle. For example, for a 2-ton (4000 lb) car, a 3-ton (6000 lb) or even 6-ton (12000 lb) bracket would be more reliable. It’s better to overprotect than to take chances.

  2. Types and characteristics of stents:
    1. Wide Base Jack Stands: These stands have a larger base area, which can better distribute pressure and perform better on soft surfaces.
    2. Standard bracket: If only a standard bracket is available, it must be used in conjunction with an auxiliary base. Be sure to check the bracket body for deformation, cracks, weld defects, or other damage. Ensure the locking mechanism is flexible and reliable.
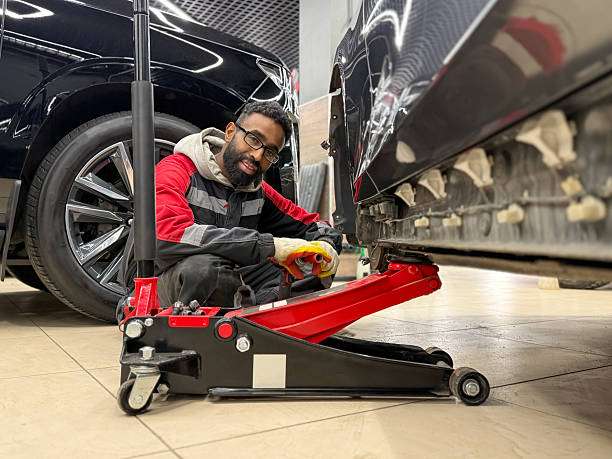
  3. Jacks: Choose the appropriate hydraulic jack. Hydraulic jacks (such as horizontal jacks or bottle jacks) are more stable and safer than the scissor jacks that come with the vehicle. Scissor jacks are only for emergency tire changes and should never be used for work under vehicles. Select a jack with a rated load that matches the bracket and whose lifting height and stroke meet your needs.
  4. Essential auxiliary tools:
    1. Wheel locks: These are the last line of defense against vehicle slippage. Wheel locks must be placed in front of and behind the wheels that are not lifted, regardless of the surface or the type of support used.
    2. Level: Used to accurately measure the levelness of the ground and vehicles.
    3. Flashlight: When the light is insufficient, ensure that the lifting point and the position of the bracket can be clearly seen.

IV. Core Solution: Enhancing the stability and anti-slip properties of the stand base

On non-standard surfaces, relying solely on the base of the support frame is far from sufficient. We need additional auxiliary tools to increase the contact area, distribute pressure, and increase the friction between the ground and the support frame.

A. DIY Base Solution: Practical Wisdom of Plywood Base

Many experienced technicians and DIY enthusiasts in the community strongly recommend using plywood as the base for the support frame, which is a prime example of using engineering principles to solve practical problems.

Why choose plywood:

  • Dispersing pressure and increasing contact area: Plywood has good planar rigidity, which can effectively disperse the concentrated pressure of the support in a small area to a larger ground area, thereby significantly reducing local pressure and effectively preventing the support from sinking.
  • Low cost, easy to obtain and process: It can be easily purchased at Home Depot or any building materials store and can be cut to size as needed.
  • Relatively good moisture resistance: Compared to ordinary wood boards, plywood is made of multiple layers of wood veneers pressed together, which can resist moisture to a certain extent.

Material selection and dimensions:

  • Thickness: 3/4 inch (approximately 19 mm) or thicker outdoor grade plywood is recommended. Thin plywood may crack due to uneven stress.
  • Size: Cut a square that is at least one size larger than the base, such as 1 foot x 1 foot (30 cm x 30 cm) or even 18 inches x 18 inches (45 cm x 45 cm). The larger the area, the better the pressure distribution effect.

Fabrication and Securing: How to ensure the bracket doesn’t slip off the plywood:

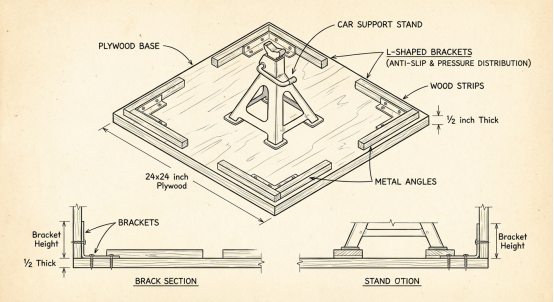
  • L-shaped baffle: On plywood, fix several small wooden strips or metal L-shaped angle irons with screws along the edge of the bracket base to form a “groove” to hold the bracket’s feet in place. This effectively restricts the lateral movement of the bracket.
  • Screw fixing: Secure the edge of the bracket base to the plywood directly with short screws. However, be aware that the bracket base is usually quite thick, and the screws may not be able to penetrate it properly, potentially damaging the bracket.
  • Grooving: If tools are available, grooves that match the shape of the bracket base can be precisely cut into the thick plywood, allowing the bracket to “embed” in them.
Diagram for DIY car support platform using plywood base for stability with jack stands.

B. Metal Plate Base Solution: A More Sturdy Option (Based on Community Experience)

For users seeking ultimate stability and durability, sheet metal is a more robust option.

Material selection:

  • Steel plate thickness: 1/8 inch (approximately 3 mm) or thicker steel plate is recommended. Thinner plates may bend under stress.
  • Size and edge treatment: It should be larger than the base of the stand, and the edges should be polished smooth to avoid scratches.

Anti-slip treatment:

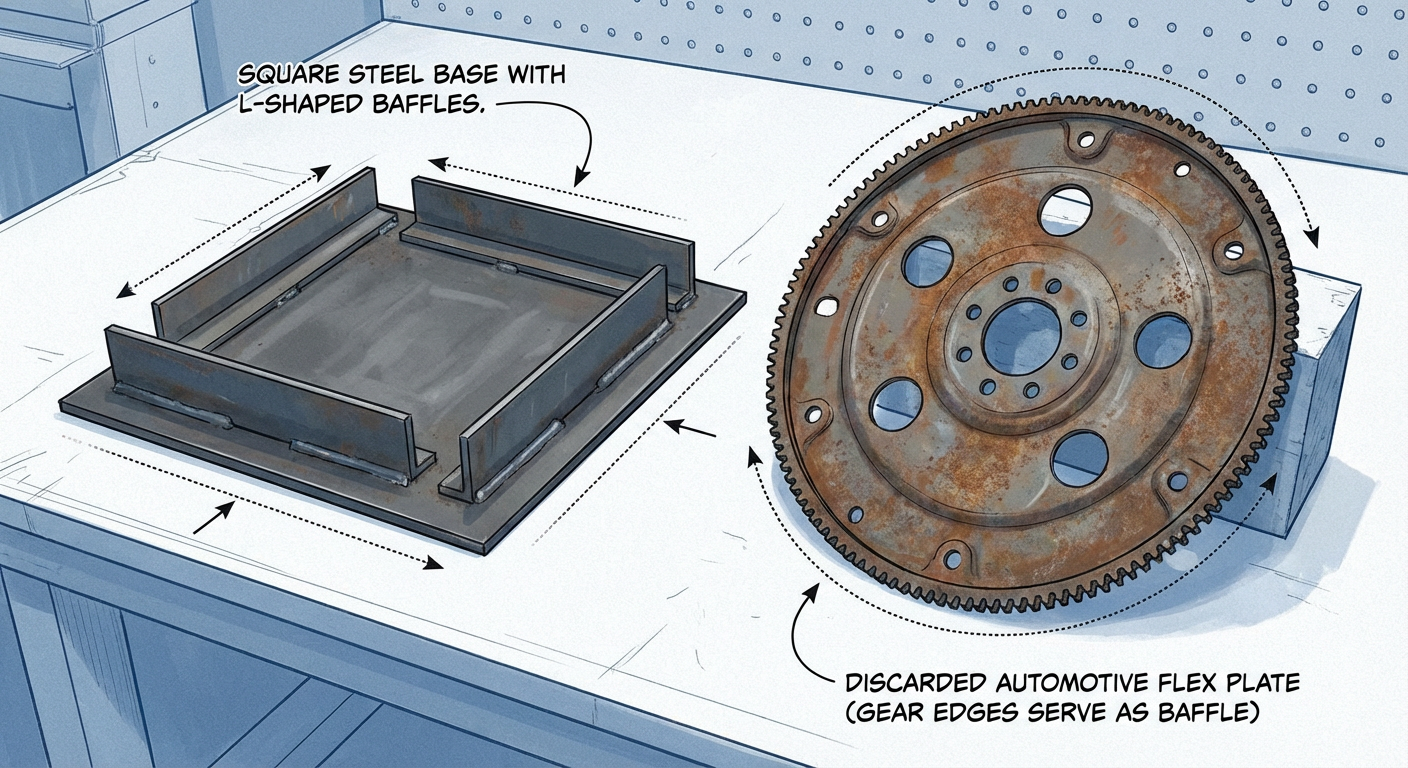
  • Welding L-shaped baffles or adding anti-slip textures: Similar to plywood, L-shaped baffles can be welded onto the steel plate to fix the support. Alternatively, anti-slip textures can be stamped or welded onto the surface of the plate to increase friction.

Innovative utilization of waste auto parts:

  • Automatic transmission flex plates: This is a “treasure” material discovered by veteran mechanics in the community. Flex plates are typically made of high-strength steel, of moderate thickness, and usually have gear-like starting rings along the edges, naturally forming a “stop” to effectively prevent the support from slipping. They are thick enough to resist sinking and can usually be found in scrap metal markets.
Workbench with custom steel base and rusty flex plate, for securing jack stands or car parts.

C. Prefabricated or professional off-road support pads:

If DIY isn’t your strong suit, there are also some solutions on the market specifically designed for non-standard flooring.

Wide-base jack stands: These stands are designed with ground contact area in mind from the outset. The base is typically square or triangular, with a much larger area than traditional stands, allowing for better pressure distribution. They are an excellent choice in the context of off-road jack stand bases.

Off-road support pads: Some manufacturers also produce specialized support pads made of high-density plastics or composite materials. These pads typically feature anti-slip textures, are less prone to sinking, and are lightweight and portable. They are generally designed to provide stable support in muddy, sandy, or rugged off-road environments.

D. Localized hardening and reinforcement of the ground:

In addition to adding auxiliary pads under the support structure, directly improving the ground conditions is also an effective strategy.

Compacting soil/gravel: If possible, in the area where the support is placed, repeatedly compact the soil or gravel with heavy objects or tools (such as a rammer) to make it as compact as possible.

Laying down moisture-proof/waterproof tarpaulins: In rally pit areas, technicians typically lay a thick waterproof tarpaulin on the dirt or gravel surface, and then place jack supports with wooden bases on top of the tarpaulin. This not only provides a relatively clean working area but also isolates the surface from moisture to some extent, preventing further softening.


V. Practical Steps for Field Repair: Every Step is Crucial

Having mastered the tools and principles, the next step is rigorous operation. In an environment like using jack stands on a gravel driveway, every step must be taken with care.

A. Vehicle positioning and basic braking:

  1. Find a relatively level surface: double-check with a spirit level, as even a slight incline can amplify the risk. If a perfectly level surface cannot be found, choose an area with the smallest possible slope and ensure the vehicle does not slide downhill after being lifted.
  2. Fully engage the parking brake. For manual transmission vehicles, shift to the lowest gear; for automatic transmission vehicles, shift to Park (P).
  3. Key: Place wheel catches in front of and behind the wheels that are not lifted. This is the most basic and important safety measure.Even if you only lift one side of the vehicle, place wheel catches in front of and behind the wheels that are not lifted on the other side.

B. Smoothly lift the vehicle:

  1. Carefully consult the vehicle owner’s manual to locate the correct lifting point: never lift non-load-bearing parts such as the oil pan, transmission housing, exhaust pipe, or plastic side skirts. These parts cannot support the vehicle’s weight and may cause damage or the vehicle to slip. The lifting point is usually located on the frame, subframe, or a designated reinforcing rib.
  2. Use a jack to lift slowly and steadily: During the lifting process, observe the reaction of the ground and the support frame (and its base) throughout. Ensure the jack itself is stable and that there is no significant sinking or slippage of the ground. Avoid rapid or violent operation to prevent the vehicle from shaking.
  3. Lifting height: Lift the vehicle only to the height required to complete the work; do not lift it too high. The higher the lifting height, the higher the vehicle’s center of gravity, and the worse its stability.

C. Securely place the support bracket:

  1. Precisely place the support bracket with its base below the lift point: ensure that the bracket is placed on the vehicle’s metal beams, frame, or manufacturer-specified support points, rather than on the fragile body panels.
  2. Ensure the locking mechanism of the bracket is fully engaged and secure: check that the ratchet teeth are fully engaged or that the safety pin is fully inserted.
  3. Maintain consistent support height to ensure even distribution of vehicle load: use a level or visual inspection. Uneven support can cause some supports to overload, increasing the risk of failure.

D. Vehicle Landing and Stability Testing:

  1. Slowly and carefully lower the jack to allow the vehicle’s weight to be fully transferred to the support bracket: After the vehicle is completely on the bracket, raise the jack slightly so that it is lightly supporting the vehicle but not under any force, as an extra safety backup.
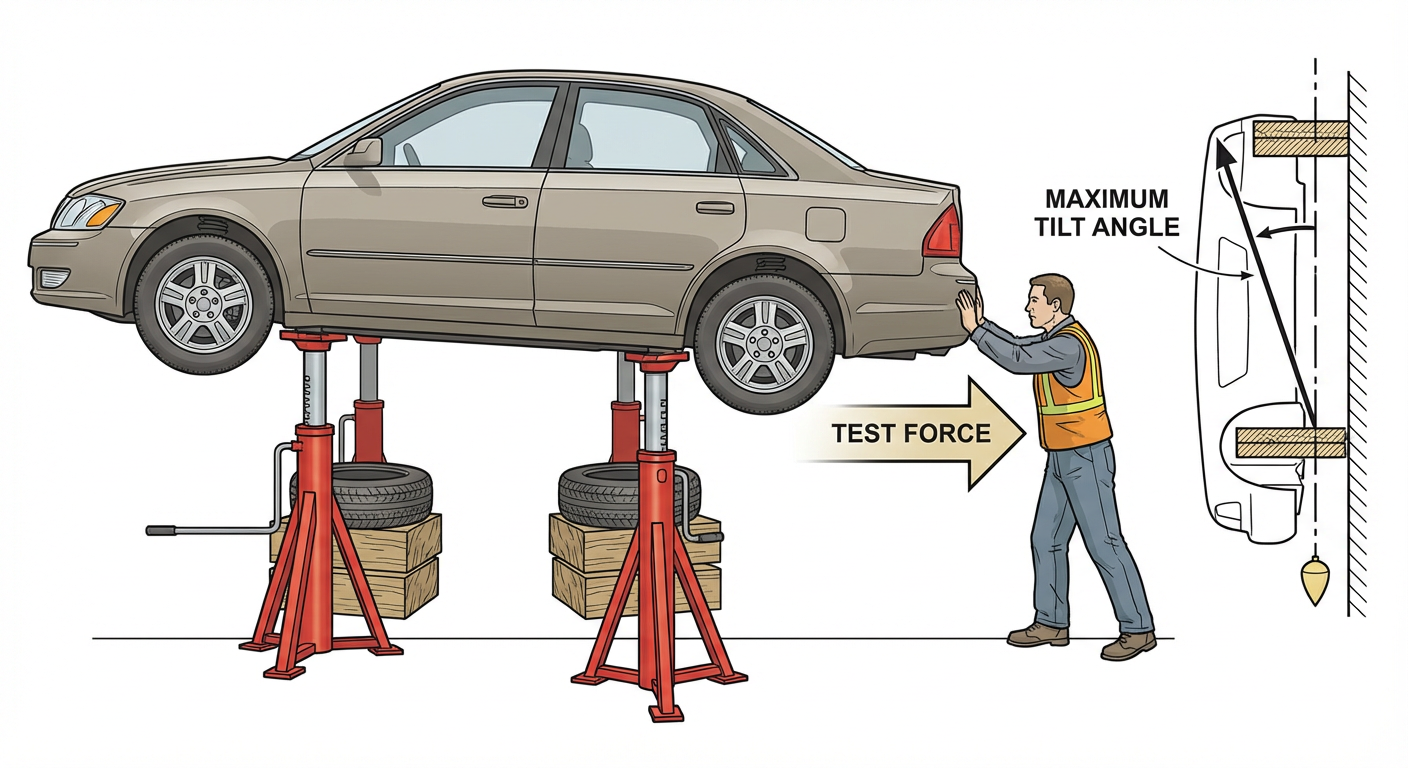
  2. Conduct a stability test: Hold the vehicle firmly with both hands (such as the side of the vehicle or wheel arches), and gently push and pull the vehicle, observing whether the support sags, slips, or shows any signs of instability. If any instability is found, repeat the operation immediately.
  3. Safety Redundancy: Place the removed wheels under the vehicle or lightly prop them up with a jack as a backup. This is the “last line of defense” I’ve emphasized for years.Even if the support structure fails unexpectedly, the wheels or spare jack can limit the vehicle’s fall height to some extent, giving you room to escape. I’ve seen too many situations go wrong because of this detail, so please don’t overlook this step.


Illustration of a car elevated on tall jack stands, undergoing a stability tilt test.

VI. Additional considerations for long-term storage and field storage

If a vehicle needs to be parked on a rack for an extended period of time, especially in a field environment, additional considerations are required.

A. The vehicle is parked on the support rack for an extended period of time:

  • Potential impacts on the suspension system, tires, and the brackets themselves: While support brackets are designed for long-term support, prolonged exposure to outdoor environments can cause them to rust.Leaving the vehicle’s suspension system in a fully relaxed or compressed state for extended periods can also cause uneven wear on its seals and bushings. Tires that are constantly compressed in one spot may develop “flat spots,” affecting driving comfort.

  • Ground settlement: If the ground is not absolutely hard, prolonged static loads may cause further ground settlement, requiring regular checks on the stability of the support structure.

B. Additional risks associated with field storage:

  • Moisture and rust: In damp outdoor environments, supports and vehicle chassis are more prone to rust.

  • Ground subsidence: If left unattended for an extended period, the ground may continue to subside due to climate change and moisture infiltration.

  • Animal intrusion: Small animals such as rats and insects may nest under the vehicle or in the engine compartment and gnaw on the wiring harness.


VII. Safety is the only shortcut and the greatest guarantee.

As I’ve repeatedly emphasized: DIY is fine, but losing control is.

Using car mounts on gravel, dirt, or soft asphalt is no small matter. It requires not only the right tools, but also a meticulous attitude and professional knowledge.

Through the strategies and practical solutions provided in this article, I hope you can gain a clearer understanding of the risks of non-standard grounds and learn how to build a truly safe maintenance environment. From choosing the right base material to strictly following the lifting procedures, every step is an investment in your own safety.

If you wish to minimize the risks of field repairs, or are interested in more professional garage safety solutions, please follow our safety guides . We are committed to providing you with the most reliable and reassuring repair knowledge and products, ensuring certainty in every task. Building a robust error-proofing system is the best way to protect yourself.


FAQ

Q1: When using a support bracket on a gravel road, besides the base, do I need wheel chocks?
Absolutely! Wheel chocks are an essential safety measure no matter where you use a support bracket. While the base improves the stability of the bracket on soft ground, preventing sinking and partial slippage, wheel chocks are the last line of defense against accidental vehicle rollover. Always place wheel chocks in front of and behind the wheels that are not being lifted to ensure the vehicle does not shift unexpectedly.
Q2: What type of plywood is best for a support base?
It is recommended to use outdoor or marine-grade plywood that is at least 3/4 inch (19 mm) thick.

Regular household plywood is usually not thick enough and has poor moisture resistance, making it prone to warping or cracking under heavy loads. Outdoor-grade plywood, with its multi-layered interlocking structure and weather-resistant adhesives, provides a much more reliable “foundation” against high pressure.
Q3: What temporary measures can I take for emergency repairs in the field?

In extreme emergencies where proper base materials are unavailable, these measures should only be used as a last resort with extreme caution:

  • Hardstone/Wood Blocks: Find the hardest, flattest stone slabs or thickest blocks of wood available. Ensure they are large enough to cover the base and free from cracks.
  • Compacted Pit: Dig a small, shallow pit under the support and compact the soil or gravel as much as possible before placing the bracket.
  • Redundant Support: Keep the jack slightly engaged as an additional emergency backup even after the vehicle is on the support bracket.
⚠️ DANGER: These are high-risk temporary measures. Once conditions permit, implement a safer solution immediately. Always remember: Life safety is paramount.
author-avatar

About Gavin Reid

Gavin Reid has been obsessively analyzing garage safety protocols and vehicle support systems for over a decade. After transitioning from a professional service bay to independent safety consulting in 2020, Gavin realized the market was flooded with confusing weight ratings and compromised designs that offered a false sense of security. His Mission: To help DIY mechanics—especially home hobbyists—identify critical failure points in vehicle lifting and ensure every project ends safely. Why Trust Gavin: Engineering Obsessive: He dissects load paths and weld integrity. From metallurgy to geometric stability, he understands the physics that keep two tons of steel from crushing a human chest. Data-Driven Testing: Gavin has stress-tested 40+ models, evaluating lateral stability and locking redundancy rather than just "marketing tonnage." In the Garage: He’s a fixture in local DIY communities, frequently inspecting frame rails for pinch weld placement and documenting metal fatigue on aging gear. Gavin believes that "a lapse in physics is a permanent mistake." He is dedicated to teaching mechanics how to maintain a "zero-trust" relationship with their equipment. Would you like me to provide Gavin’s specific checklist for identifying structural fatigue in used jack stands?