Jack Stands

A Mental Guide to Completely Trusting Jack Stands for the First Time

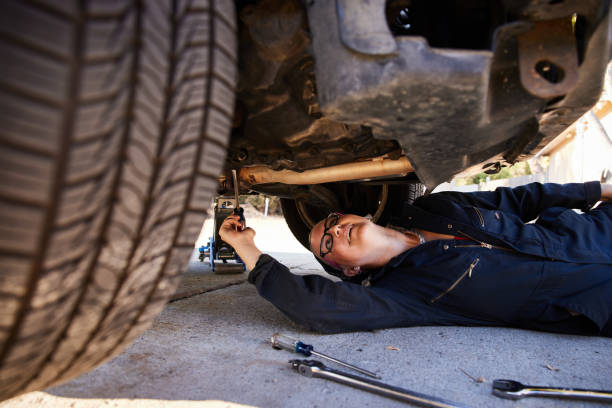
Woman mechanics under car, safely supported by jack stands.

Hello, friend. If you’re reading this, I’m guessing you might be like me back then: you bought a Jack Stands , but after setting up the bike, you always hesitated to actually crawl under it. I understand that mix of anticipation and fear all too well.

Today, I want to talk to you not just about the technology, but more importantly, how to build deep trust in your Jack Stands and say goodbye to that subconscious fear.

Mechanic working under a car securely lifted with jack stands.

Breaking the ice: Acknowledge your fears, because I understand.

Every experienced driver was once a novice: the nervousness of lifting the car for the first time.

I still remember the first time I used Jack Stands . The bike was lifted by the jack, the two stands were carefully placed, and the bike slowly lowered, landing steadily on the stands.

At that moment, my heart was pounding, and my palms were sweating. Although I checked the placement repeatedly, and although I knew the stands could bear enough weight, the thought, “What if it collapses?” haunted me like a ghost. This is normal, because we were dealing with a steel behemoth weighing thousands of pounds; a mistake could have disastrous consequences.

Why we are afraid: Subconscious risk assessment

This fear isn’t unfounded; it’s our brain’s instinctive reaction to potential danger. Your subconscious is rapidly assessing the situation:

  • Can these Jack Stands really hold up?
  • Did I put it in the wrong place?
  • Will there be any problems with the ground?
  • What if it shakes?

These are all legitimate concerns, and they form the basis of our trust. We cannot rely on wishful thinking, nor can we deceive ourselves with “parameter worship.”

True security comes from a clear understanding of risks and effective avoidance strategies; it comes from “predictability,” not luck.

It’s not just about technology, but also about psychological conviction.

Today, I won’t just tell you “how to do it,” I’ll also delve into “why do it this way.” I’ll share some methods that have proven effective in building trust in my garage security experience, including a crucial “shake test” and “protective strategies.”

After reading, I hope you feel: “I realized how many risks I overlooked before, and now I understand better how to do things safely; this brand is on my side.”


Understanding Jack Stands’ “Language of Mechanics”

To trust Jack Stands, you must first understand him, just as you would understand the temperament of an old friend.

The “trap” of load-bearing parameters: the true safety redundancy behind the numbers

Many beginners look at the load capacity parameters on the Jack Stands, such as “2 tons” or “3 tons.” Then they ask, “My car weighs 2 tons, are 2-ton Jack Stands enough?” This question seems simple, but it actually hides a huge misconception.

Vehicle gross weight and single-point support: the math you need to know

The total weight of a car is borne by all four wheels. When you use Jack Stands, you’re typically supporting a portion of the vehicle (such as the front or rear axle) or a corner.

This means that the weight you lift in a single operation is far less than the vehicle’s total weight. For example, a 2-ton (approximately 4,000-pound) sedan, if you lift its front end, will typically have only half or less of its total weight (approximately 1,000-2,000 pounds) resting on the two stands.

What does the rated load capacity of Jack Stands mean?

Jack stands’ rated load capacity usually refers to the total load capacity of a pair (two stands), but a safer understanding is the load capacity of a single stand. For example, a pair of 3-ton jack stands means each stand can safely support 1.5 tons.

My years of garage safety experience have taught me never to push tools to their limits. Leaving sufficient safety margin is central to professional operation.

If you have a 5,000-pound pickup truck, even if a pair of 3-ton (6,000-pound) stands is theoretically sufficient, I would strongly recommend choosing 6-ton stands, as this provides a greater safety margin, especially considering changes in the center of gravity and lateral loads.

Ground conditions: A silent “safety killer”

The stability of Jack Stands is highly dependent on ground conditions. This is a hard truth I’ve come to after seeing too many cases where support failures were caused by ground issues.

Hardness, smoothness, and friction: how they affect stability

Imagine you’re standing on a soft cushion versus a hard surface—which is more stable? The same applies to vehicles.

  • Hardness: The harder the ground, the less likely the Jack Stands’ base will sink and the more evenly the force will be distributed.
  • Flatness: The flatter the ground, the more evenly the four corners (or three corners) of the Jack Stands will bear the force, reducing the risk of tipping over.
  • Friction: High friction prevents Jack Stands from slipping when the vehicle shakes.

Asphalt, mud, and cement: Risk levels of different ground surfaces

  • Cement floor (hard and flat): Ideal choice. But make sure there are no cracks or damage.
  • Asphalt surfaces (high risk in summer): Asphalt softens at high temperatures, causing the base of the jack stands to sink, leading to instability or even tilting. If you must work on asphalt, be sure to place sufficiently large, thick planks (such as 2×6-inch planks) under the base of the stands to distribute the pressure.
  • Mud/grass (high risk): Absolutely prohibited. These surfaces are extremely unstable; the supports could sink or even tip over immediately.

Center of gravity: The “Achilles’ heel” of vehicle lifting.

Shifts in the center of gravity are the direct cause of most accidents. This is not just theory, but a bloody lesson learned.

The Importance of Lift Point Selection: The Stable Triangle Principle

Your car manufacturer has designed specific jacking points under the vehicle. These points are typically located on the frame, subframe, or reinforced welds.

These points are calculated by engineers to support the vehicle’s weight and maintain stability.

Incorrect placement of jacking points causes accidents more often than product quality issues.

Never place jacking stands on the exhaust pipe, oil pan, plastic parts, or any undesignated location.

When a vehicle is lifted, its center of gravity rises, reducing stability. You need to ensure that the Jack Stands are placed on support points that form a stable “triangle” or “quadrilateral” to distribute the vehicle’s weight evenly. For example, when lifting the front of the vehicle, the two stands should be placed at designated points on either side of the front axle, ensuring they are at the same height.

Unexpected swaying and weight shift: How to predict and avoid them

When working under a vehicle, you may push or pull the vehicle or disassemble certain parts (such as the gearbox), which can cause unexpected changes in the vehicle’s center of gravity.

  • Anticipation: Before starting work, consider which operations will change the vehicle’s center of gravity. For example, disassembling the engine or transmission will lighten the front of the vehicle and shift the center of gravity rearward.
  • Avoid: Minimize the application of lateral forces to the vehicle from under it. If necessary, ensure your safety redundancy system is robust enough.

I’ve seen far too many problems arise from this detail.


Establish your “Trust Ritual”: Psychological and Technological Reinforcement

Now, let’s establish a “trust ritual” that will give you peace of mind, both psychologically and technically.

Choosing the right bracket: A “safety philosophy” from materials to locking mechanisms

A good Jack Stands is the foundation of your trust.

Structure and Welding: Visible Quality

Carefully inspect the welds and metal structure of your Jack Stands. Good welds should be smooth, continuous, and free of bubbles or cracks. The metal structure should be sturdy and free from deformation or excessive wear.

Metal structures are susceptible to fatigue and aging, especially in humid environments, where rust can weaken their strength.

Inspect your tools regularly, just as you would inspect your car.

Locking mechanisms: Ratchet type vs. Pin type

  • Ratchet type: The most common type, easy to adjust. However, it’s crucial to ensure the ratchet teeth are tightly engaged and the locking lever is secure. The previous Harbor Freight recall was related to a defect in the ratchet mechanism, reminding us that even major brands need to be wary of potential structural issues.
  • Pin type: Generally considered more secure because the pin passes directly through the bracket, providing a physical lock. However, adjustment is not as convenient as with ratchet type.

Regardless of the type, it is essential to ensure that the locking mechanism does not unexpectedly disengage after bearing weight.

Wide base and anti-sag design: the cornerstone of stability

Jack Stands with a wide base provide a larger contact area. Some designs also include anti-sinking feet, which is especially useful when working on softer surfaces such as asphalt.

The “Shake Test” – Give yourself a “mental anchor”.

This is a “trust ritual” that I teach all beginners and that I always perform before operating the vehicle. It gives you intuitive feedback, letting you know if the vehicle is truly stable.

Why do we need to perform a shaking test?

Because data is static, while feeling is dynamic. You might follow all the steps, but still feel uneasy.

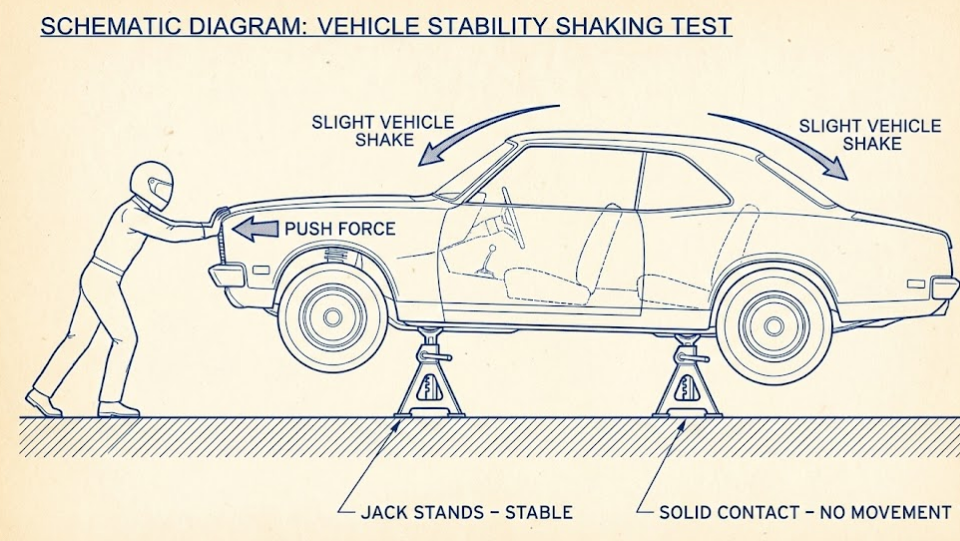
The purpose of the shaking test is to simulate the slight shaking a vehicle might experience during maintenance using a controlled external force, thereby verifying the stability of the support. It provides you with a direct “psychological anchor,” letting you see that the vehicle is stable.

Correct shaking method: force and direction

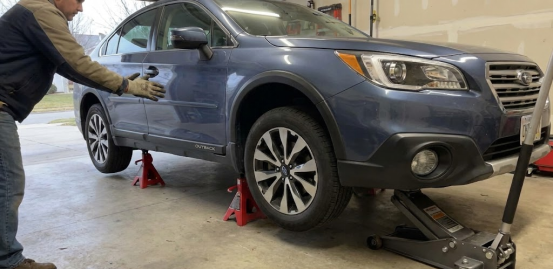
  1. To ensure everything goes smoothly: Before conducting the test, make sure your jack is still under the vehicle, under slight load or just touching the chassis, as a final precaution.
  2. Choose a stable point: Stand to the side of the vehicle (not in front or behind), and hold onto a sturdy part such as the door frame or wheel arch with both hands.
  3. Apply even force: Use moderate force to push and pull evenly to the side of the vehicle. Do not push or pull suddenly, as that could actually flip the car. Imagine that you are “gently” testing its stability, not challenging it.
  4. Observation: Observe whether the vehicle is shaking or tilting, or whether the Jack Stands show any signs of slipping, sinking, or deformation.

What kind of reaction is safe?

A safe response is when the vehicle barely moves, or experiences only very slight, predictable shaking, and the Jack Stands remain perfectly still.

If the vehicle shakes noticeably, or if the Jack Stands slip, make any unusual noises, or sink, stop immediately and recheck all support points and the ground until you are satisfied.

Schematic showing a vehicle stability test using stable jack stands.

Ultimate security redundancy: protection strategy

True safety is always built upon multiple layers of protection.

Safety redundancy is the core of professional operation. The most important lesson I learned from working in garages for many years is: never put all your eggs in one basket.

Jack Stands: Main load-bearing

These are your main load-bearers, supporting the majority of the vehicle’s weight. Ensure they are positioned at the manufacturer-specified lift points, at a consistent height, and firmly fixed without wobbling.

Jack: A second line of defense ready to be deployed at any time

Even after the vehicle is securely placed on the jack stands, I still recommend leaving the jack under the vehicle, slightly raised so that its tray just touches the chassis, but doesn’t bear the full weight.

This way, in case the jack stands malfunction, the jack can provide immediate cushioning, giving you valuable reaction time. Think of it as a “shadow bodyguard” always on standby.

Spare tire/wooden block: An unexpected lifesaver

This is a strategy many people overlook, but it could save your life in a critical moment.

If you are lifting a corner or side of a vehicle, place a spare tire or a sturdy block of wood (such as several stacked 4×4-inch planks) under the vehicle, as close to the work area as possible, as an extra physical barrier.

Even if the vehicle does collapse, it will land on the tire or the wood instead of crushing you directly.

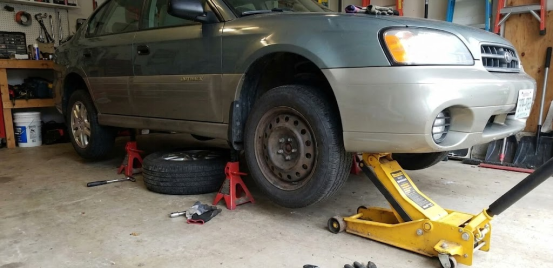
Car lifted for tire change in garage, secured by sturdy red jack stands.

Wheel stops: the last line of defense against rolling

This is the most basic yet most easily overlooked step. Regardless of which end of the vehicle you lift, place wheel chocks in front of and behind the undisturbed tires. This effectively prevents the vehicle from accidentally rolling during repairs, especially on slightly sloping ground or if you accidentally bump into the vehicle.


Building Trust: From Knowledge to Action

Trust is a process that is built up gradually.

Every operation is a learning experience.

Every time you successfully lift a car, hold it firmly, and complete the repair, it reinforces trust. You’ll gradually accumulate experience and gain more confidence in your judgment.

Your safety is your responsibility.

No one can be 100% responsible for your safety except yourself. Learning this knowledge and strictly adhering to it is the best way you can be responsible for yourself and your family.

Take the first step: Start with simple tasks

If this is your first time using Jack Stands, don’t rush into complex repairs. Start with simple tasks, such as changing a tire or checking brake pads. These tasks will familiarize you with the process, build confidence, and involve relatively low risk.


DIY is fine, the problem is getting out of control.

Friend, I hope this guide will help you overcome your fear of Jack Stands, allowing you to enjoy the fun of DIY while always prioritizing safety.

Remember my core belief:

DIY is fine, losing control is the problem.

As long as you have the right knowledge, establish multiple safety redundancies, and remain vigilant in every operation, you can manage the risks and work safely under vehicles.

If you want to minimize the risks of garage repairs or have higher requirements for safety redundancy, we offer more professional tools and solutions that are your reliable partners on your DIY journey.

author-avatar

About Gavin Reid

Gavin Reid has been obsessively analyzing garage safety protocols and vehicle support systems for over a decade. After transitioning from a professional service bay to independent safety consulting in 2020, Gavin realized the market was flooded with confusing weight ratings and compromised designs that offered a false sense of security. His Mission: To help DIY mechanics—especially home hobbyists—identify critical failure points in vehicle lifting and ensure every project ends safely. Why Trust Gavin: Engineering Obsessive: He dissects load paths and weld integrity. From metallurgy to geometric stability, he understands the physics that keep two tons of steel from crushing a human chest. Data-Driven Testing: Gavin has stress-tested 40+ models, evaluating lateral stability and locking redundancy rather than just "marketing tonnage." In the Garage: He’s a fixture in local DIY communities, frequently inspecting frame rails for pinch weld placement and documenting metal fatigue on aging gear. Gavin believes that "a lapse in physics is a permanent mistake." He is dedicated to teaching mechanics how to maintain a "zero-trust" relationship with their equipment. Would you like me to provide Gavin’s specific checklist for identifying structural fatigue in used jack stands?