Jack Stands

How to accurately locate “Pinch Welds on Car” under the car and place Jack Stands

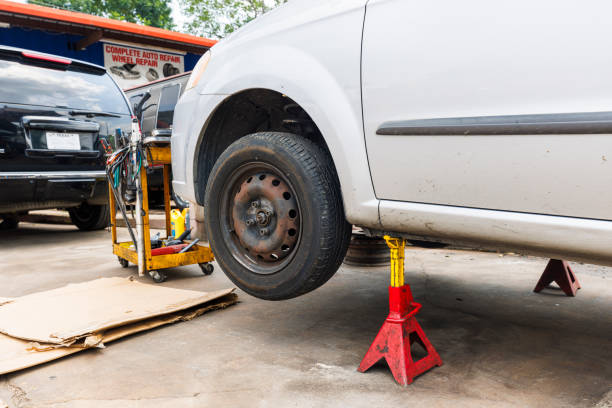
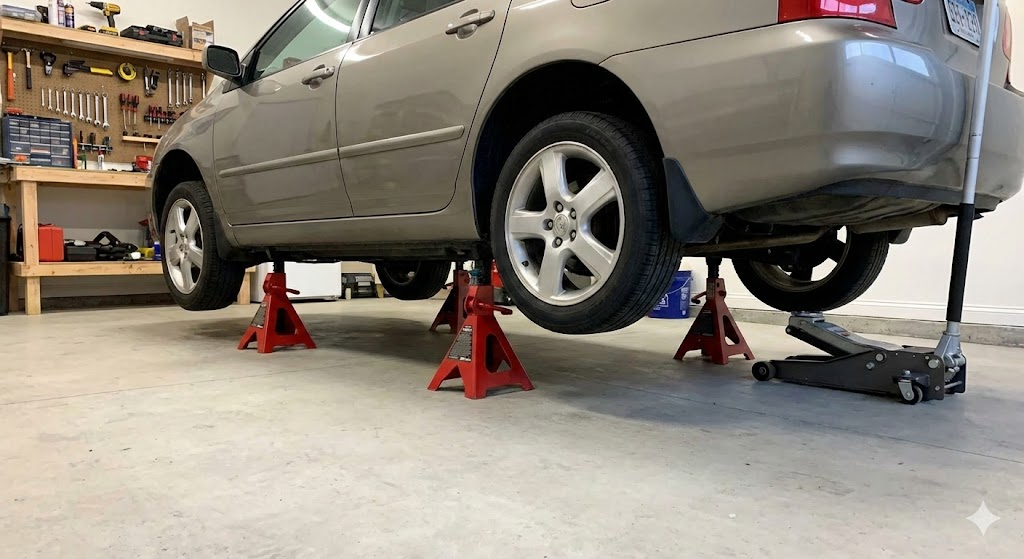
Silver car lifted by red jack stands for tire service in a garage.

The joy and sense of accomplishment from DIY vehicle repair are undeniable, but how do we ensure our beloved car remains stable and undamaged after lifting it?

This is often the most anxiety-inducing and confusing part for many new drivers, and even some experienced car owners. Especially regarding the crucial “Pinch Welds on Car” support point, many people have only heard of it but lack detailed knowledge, and some even place the Jack Stands incorrectly, thus creating significant safety hazards.

Today, I will act as your personal garage safety consultant, guiding you through an in-depth understanding of Pinch Welds and providing a clear and practical “hands-on” guide to identifying and placing Jack Stands.

We’ll start by explaining the structural intricacies of Pinch Welds, teaching you step-by-step how to accurately locate them using both sight and touch.

We’ll share the golden rules for safely and securely placing Jack Stands on them, while also correcting some common safety misconceptions, allowing you to confidently handle under-vehicle operations and take safety into your own hands.


The cornerstone of vehicle support: Why are “Pinch Welds” so important?

Before embarking on any work under a vehicle, it’s crucial to understand that vehicles are not simply supported arbitrarily. The design of a car chassis is a complex mechanical system, with varying strengths and load-bearing capacities across its different parts.

“Pinch Welds” are precisely the key areas within this mechanical system specifically designed to withstand lifting and support forces.

Understanding the structural advantages of “Pinch Welds”

Pinch welds, often translated as “pinch seams” or “skirts,” are specially reinforced parts in the automotive body structure. They are typically located below the doors and extend along the side of the bottom of the vehicle body.

From an engineering perspective, pinch welds are raised structures made of two or more layers of steel plates tightly bonded together through pressing and spot welding processes. This stacking and welding of multiple steel plates gives them strength and rigidity far exceeding that of the surrounding thin metal sheets.

Its design purpose is very clear: to distribute and bear enormous vertical loads when a vehicle is lifted or supported, and to safely transfer these loads to the main frame structure of the vehicle body.

You can think of it as a “load-bearing beam” specifically designed for jacks or jack stands in the vehicle body.

In stark contrast, if we place jack stands on fragile floor pans or rocker panels (side skirts, especially plastic or decorative side skirts), these areas are often only supported by a single thin sheet of metal, which is simply unable to bear the weight of the vehicle. The result can range from chassis deformation and damage to, in severe cases, jack stands penetrating the body, causing the vehicle to instantly lose support, slip, or even overturn.

This structural difference is the core reason why jack stands are indispensable in vehicle support.

Diagram showing chassis force distribution; essential for safe use of jack stands.

Develop a keen eye: How to accurately identify and touch “Pinch Welds”

Since Pinch Welds are so important, how can you accurately locate them? To a beginner, the world under a car may look like a dark mass of metal, but with the right methods, you can easily identify them.

Looking for “clues” along the edge of the chassis.

Pinch welds are typically located at the bottom of the vehicle body, near the inside of the wheels, extending along the inner edge of the side skirts below the doors.

Visual recognition:

  • Appearance features: It is a slightly thickened metal ridge that protrudes outward from the chassis. It is usually a noticeable bulge, unlike other flat areas of the chassis.
  • Factory markings: Many car manufacturers will place small grooves, arrows, or painted markings above or below the pinch welds, near the four wheels, to clearly indicate the placement of the jacks or jack stands. Be sure to consult your vehicle’s owner’s manual for the specific location of these markings.
  • Location: On most vehicles, these points are located on the inside of the front and rear wheels, corresponding to the two ends of the rocker panel.

Tactile confirmation:

  • After visually locating the point, confirm it by touch. The Pinch Welds should feel firmer and thicker than the surrounding area. It should not feel noticeably elastic or thin. If you feel a thin sheet of metal, or an area that feels easily deformable under pressure, it is definitely not a safe support point.
  • In the Pinch Welds structure, some vehicles may have additional reinforcing blocks or pads in specific locations, which are designed by the manufacturer for guiding support.

Jack Stands must never be placed there.

Understanding the importance of Pinch Welds, it is equally important to know where Jack Stands should absolutely not be placed.

These areas share the common characteristic of being structurally fragile and unable to withstand the concentrated loads of a vehicle. Once subjected to stress, they are highly susceptible to deformation or breakage, leading to vehicle instability.

Here are some common mistakes to avoid:

  • Oil pan / transmission pan: These are the fragile outer shells of the engine and transmission, made of thin metal or plastic, and contain vital fluids. Damage to them not only results in high repair costs but also an immediate loss of support.
  • Exhaust pipe / muffler / catalytic converter: These are components suspended under the car. Although they appear to be metal, they are not load-bearing structures. They expand and contract with heat and can become brittle due to corrosion.
  • Non-designated areas of suspension components, such as shock absorbers, springs, and tie rods. While these components are robust, they are designed for movement and cushioning, not for bearing static vertical support forces. Supporting the vehicle in these areas can damage the suspension system and even cause the vehicle to move unexpectedly under stress.
  • Fragile plastic cover / thin sheet metal areas: Any area that appears to be plastic or a very thin sheet metal should not be used as a support point. They cannot support the weight of the vehicle.
  • Brake lines / fuel lines: These are the lifelines of a vehicle; if they are crushed or damaged, the consequences could be disastrous.

Remember, single-point support is a high-risk practice. Even if you find a point that looks sturdy, it can still fail due to stress concentration if it wasn’t designed to distribute loads.

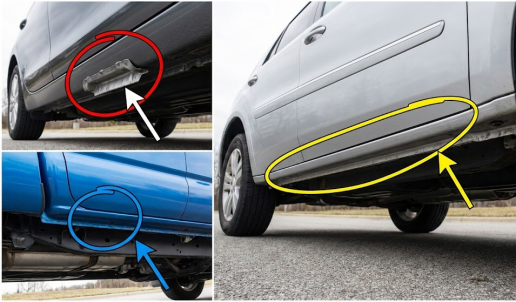
Pinch welds and frame points for safely positioning jack stands on different vehicles.

Place the “Jack Stands” precisely on the “Pinch Welds”.

Having identified the Pinch Welds, the next step is to safely and accurately place the Jack Stands in their positions. This requires meticulous attention and adherence to procedures; every step must be executed flawlessly.

Preparation: Ensure everything goes smoothly

Before you lift the vehicle, please make sure to do the following:

  1. Choose a flat, hard surface: Jack Stands are highly dependent on ground conditions. Always operate on a flat, firm concrete surface. Grass, sand, mud, or uneven asphalt can cause Jack Stands to sink or tip over. If you must operate on asphalt, place a sturdy, thick wooden plank under the Jack Stands to distribute the pressure.
  2. Use wheel chocks: This is your last line of defense for safety. Place wheel chocks in front of and behind the wheels diagonally opposite the axle you want to lift (e.g., the front axle) and behind the wheels (e.g., the rear axle). If you are only lifting one wheel, place wheel chocks on the other three wheels. They effectively prevent the vehicle from rolling accidentally during lifting or supporting.
  3. The core of professional operation: I recommend not immediately removing the floor jack after the vehicle is fully on the jack stands. Loosen the floor jack slightly, allowing it to remain in slight contact with the vehicle as an extra safety margin. Alternatively, if available, use additional jack stands placed at other safety support points to create multiple layers of protection. This concept of “an extra layer of support” is the core of professional technicians’ safety assurance.

Placement Tips: Alignment and Fit

Now, let’s talk about how to precisely place Jack Stands on Pinch Welds:

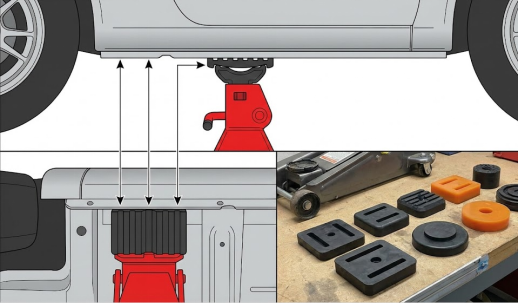
  1. Using jack pads: This is a very important but often overlooked detail. While pinch welds are sturdy, direct contact with metal jack stands can still damage their surface and even cause corrosion. Jack pads are typically made of high-strength rubber or polyurethane, and they can:
    • Protect Pinch Welds: Prevents direct metal-to-metal contact, avoiding scratches, dents, and coating damage.
    • Increase friction: The rubber material effectively increases the friction between Jack Stands and Pinch Welds, reducing the risk of slipping.
    • Evenly distribute force: Jack pads with grooved design can better wrap around Pinch Welds, making the force more even.
  2. Precise alignment: Align the top of the Jack Stands (usually U-shaped or saddle-shaped) with the center line of the Pinch Welds. If using jack pads, ensure the Pinch Welds are securely fitted into the grooves of the pads.
  3. Adjust the height: After raising the vehicle to the required height, adjust the Jack Stands to the appropriate height so that the top of them just touches the Pinch Welds (or jack pad).
  4. Lower slowly: Operate the floor jack slowly and smoothly, allowing the vehicle’s weight to gradually and evenly transfer to the jack stands. Avoid lowering suddenly, as this will create an impact and may cause the jack stands to shift.
Diagram illustrating correct jack stands placement with rubber pads for vehicle maintenance.

Shaking test and center of gravity stability

Before you crawl under the car, be sure to perform one last and crucial check:

  1. Slight shaking test: Gently shake the vehicle to ensure the Jack Stands are stable and do not slip, tilt, or show any signs of instability. If the vehicle shakes at all, immediately readjust the Jack Stands or check the placement.
  2. Check for levelness: Ensure the vehicle is roughly level on the Jack Stands. A shift in the center of gravity is a direct cause of most accidents. If one side of the vehicle is higher than the other, the center of gravity will shift, increasing the risk of rollover.

I’ve seen too many problems arise because of this detail. I’d rather spend an extra minute checking than risk even a second. Your safety is far more important than saving a few minutes.


Conclusion

Dear car owners, mastering how to accurately locate “Pinch Welds on Car” and safely place Jack Stands is the foundation for any DIY undercarriage repairs.

This is not just about technique, but also about respect for life and anticipating risks. Through today’s sharing, I hope you can truly understand the structural advantages of Pinch Welds, learn to identify them with a keen eye, and strictly follow every safety step when placing Jack Stands.

The joy of DIY repairs lies in solving problems by hand, but only if it’s safe and under control. From novice to expert, you need more than just tools; you need the right knowledge and a meticulous attitude. Let’s work together to make every garage job more predictable, not just a matter of luck.

To learn more about choosing the right type of Jack Stands, how to select different tonnages, and how to maintain and care for them, add an extra layer of security to your garage.


FAQ

Can the jack stands be placed directly on the chassis floor?

The floor pan is typically made of thin metal sheets designed to create interior space rather than bear concentrated loads. If jack stands are placed directly on the floor pan, the vehicle’s weight is concentrated in a small area, making the floor pan highly susceptible to deformation, penetration, or even the vehicle losing support and slipping.

In contrast, Pinch Welds are specially reinforced load-bearing structures.
What are the benefits of using jack pads for placing jack stands?

Jack pads offer three main advantages:

  • Protection: They protect Pinch Welds from scratches, dents, and coating peeling, extending the life of the anti-corrosion coating.
  • Stability: Usually made of rubber or polyurethane, they increase friction and reduce the risk of the stand slipping or shifting.
  • Even Distribution: Pads with grooved designs distribute pressure more evenly for a more secure support.
Besides Pinch Welds, where else can jack stands be safely placed?

Other safe locations include:

  • Main frame rails: Especially for body-on-frame trucks and SUVs.
  • Subframe: Sturdy parts of the vehicle’s subframe.
  • Solid axle: The center of a solid axle (e.g., sides of the rear differential housing), ensuring sufficient contact surface.
Always consult your owner’s manual to confirm manufacturer-specified lift points.
How much tonnage should I choose for jack stands to ensure safety?

Their rated tonnage should be significantly greater than the actual lifting capacity needed. For a 2-ton vehicle, it is recommended to choose a pair of 3-ton or even 6-ton jack stands.

This is because rated tonnage represents static vertical load under ideal conditions. Factors like ground surface, placement, and lateral forces can affect safety. Higher tonnage provides greater stability and stronger resistance to accidents.

author-avatar

About Gavin Reid

Gavin Reid has been obsessively analyzing garage safety protocols and vehicle support systems for over a decade. After transitioning from a professional service bay to independent safety consulting in 2020, Gavin realized the market was flooded with confusing weight ratings and compromised designs that offered a false sense of security. His Mission: To help DIY mechanics—especially home hobbyists—identify critical failure points in vehicle lifting and ensure every project ends safely. Why Trust Gavin: Engineering Obsessive: He dissects load paths and weld integrity. From metallurgy to geometric stability, he understands the physics that keep two tons of steel from crushing a human chest. Data-Driven Testing: Gavin has stress-tested 40+ models, evaluating lateral stability and locking redundancy rather than just "marketing tonnage." In the Garage: He’s a fixture in local DIY communities, frequently inspecting frame rails for pinch weld placement and documenting metal fatigue on aging gear. Gavin believes that "a lapse in physics is a permanent mistake." He is dedicated to teaching mechanics how to maintain a "zero-trust" relationship with their equipment. Would you like me to provide Gavin’s specific checklist for identifying structural fatigue in used jack stands?